Blog
-
car care tips EVERY woman needs to know!!
9:36 AM PST, 7/29/2009
a few years ago me and a friend were faced with a flat tire :(...we kinda knew what to do or so we thought...when we started to change the tire we found out REAL quick we didn't have a clue what to do...when we finally got home i told my dad that he should be ashamed of himself because he never taught me how to change a tire...now mind you...i knew how to run a screw~driver, swing a hammer, sew, and cook so i was sure i was the total package...ya know jack of all trades...well the ole sayin' is true...jack of all trades...jenny of none :)...i wasn't as well rounded as i thought...my challenge to all the dads, granddads, husbands, brothers, sons, make sure the women in your life knows how to change a flat tire...it doesn't matter if they drive or not...ya never know when it'll come in handy
How to change a Flat TireFix that sinking feeling!Few people like to change a tire. But if you can follow simple directions, this is a good opportunity to revoke your "mechanically incompetent" status. You'll also save time, money and stress, and your passengers will consider you the greatest thing since sliced bread. With this 2torial you'll be back on the road in a jiffy.To change a tire (or more accurately, a wheel with a tire on it), you need another to replace it. Many car owners haven't checked the spare since they bought the car.Take the time to look for your spare tire. Under the floor of the trunk and under the rear of a truck are the usual spots. Whether it's a full-size tire or one of those small, low-quality, high-pressure ones, make sure that it's properly inflated and easily accessible.While you're exploring the car, check the car's jack as well, especially if you bought the car used. It's not uncommon for the jack to be missing or incomplete. Find that out now, before you need to use it.Most cars come with a lug nut remover that's nearly useless... it's small, it slips, and it gives you no leverage. Go to an auto supply store and buy one that's shaped like a cross. They generally have three different sized sockets, plus a pry end, and give you a much better shot at removing a frozen wheel lug. Just make sure that one of the sockets fits your wheel's lugs securely before you leave the parking lot.Find the right spotWhile you're doing all this, you'll probably have traffic passing you. Especially if it's nighttime, the oncoming cars will have a hard time seeing you crouched down at the front of the car--so choose your changing spot well. However, the more that you drive on the flat tire, the greater the chance that you'll damage it beyond repair. Look for the first good spot, not the second.Find a level area where you can work. It's dangerous to jack up a car on a hill or incline.Find a spot where you can pull the car over, out of the way of traffic. A long, straight stretch of road is better than just around the bend in a road. Traffic will be able to see you, rather than coming upon you unexpectedly.Turn on your emergency flashers (usually near the steering wheel). Set the parking brake! Put automatic transmission cars in park. Put manual transmission cars (stick shifts) in first or reverse gear. To be really safe, put two bricks or rocks (at least the size of your fist) in front of and behind the tire opposite the flat. This will help keep the car from inadvertently rolling.If you have a tarp with you, spread it on the ground next to the flat tire. Weigh it down with rocks or heavy objects so the wind won't pick it up. This will give you a clean space to kneel, and place wheel parts. If you have gloves with you,Get the spare and the jackYou can't remove the old wheel without a jack. The spare is probably right next to it.The spare tire is usually located in the wheelwell, which is often on the bottom of the side of the car. It's either an indented area or a slot of some kind where the jack is meant to reside. Your owner's manual has a diagram that will locate it for you. Most often, the spare will be held in place by a bracket or a bolt that unscrews by hand pretty easily.If the jack is located in metal slots, slide it out and make sure that the handle is there as well. Many jack handles double as the lug remover, but if you have a real lug wrench (see above), you won't need to use it as such. Bring them both over to the work area, along with the lug wrench. If you're doing this at night, take care not to lose the jack handle in the dark.Loosen the lug nutsIf you try to loosen the lug nuts after jacking up the car, the wheel will just spin on you. Loosen those nuts now and make it easier on yourself.There are generally four or five lug nuts near the center of a wheel. Sometimes they're hidden under a hubcap, or a plate that needs to be pried loose. If this is the case, use the flat end of the lug wrench (or jack handle). Insert it into the slot provided at the edge of the plate, or at the edge of the hubcap. Pry the plate or hubcap off and don't let them roll away. Now that you've removed the hubcap, find the end of the wrench that fits properly. Place it over any of the lug nuts.Turn counter-clockwise to loosen the nut. Do you have the cross-shaped lug nut wrench? If so, grab the opposite ends of the wrench. Use that leverage to loosen the lug nuts.Many people have trouble removing very firmly tightened lug nuts. If you're in that situation, here are a few strategies to help loosen them. Steady the wrench with your hand if possible, and step down hard on one end of the wrench with your foot.Place your foot carefully onto the wrench. Holding onto the car, step with your full weight onto one end of the wrench. Bounce up and down on that end until the nut loosens.Find a rock. Hammer on the end of wrench with it.Once the nut has loosend and turns more readily, continue turning the wrench until a few remaining turns with your hand will release it. Repeat the process with the remaining lug nuts. Note: Leave the lug nut on the threaded shaft.Jack up the carTo get the wheel off, you'll need to raise that corner of the car.Most often, the spare will be held in place by a bracket or a bolt that unscrews by hand pretty easily.Raise the jack enough so that it just touches the car. Almost all jacks are raised by inserting the jack handle into a socket on the jack body, and turning the handle. Some jacks are raised with a scissor-type motion. In a scissors-type jack, the socket can be hidden in the center of the jack body, while in others it may be more obvious. Don't worry about holding the jack in place while turning the handle. You can position the jack when it's raised enough to reach the car.Once the jack is raised enough to touch the car, it's time to position it properly. Each manufacturer has a special place designated for the jack contact--that's the spot where the jack lifts the car. If you have a manual, it should contain this information.The positions for the jack are usually about 6 to 12 inches behind the front tire, or 6 to 12 inches in front of the rear tire. Search a few inches in from the car's body for the car's sturdy frame, and avoid using the suspension.Make sure that the jack is flat on the ground. Crank it a few more times to secure it properly.When you're certain the jack is positioned properly, continue turning the handle so that the car rises off the flat tire. You'll need to fit a fully inflated tire under there, so give it a few extra turns to make sure there's enough room.Remove the old wheelYou left the nuts on the old wheel, so that you wouldn't lose them. Now it's time to remove them.Spin all the lug nuts off with your hand, and put them aside (in the hubcap if you have one, or on the tarp).Grasp the wheel by two sides of the tire (at the three o'clock and nine o'clock positions). Pull the wheel straight out and off. Keep your weight forward or you'll fall backwards and land on your butt. Roll the old wheel to one side.Put on the new wheelHolding the spare wheel, try to line up the holes in the center with the threaded shafts that they fit over. Shift and slide the spare wheel over the shafts until it's seated properly, and can't be pushed any farther onto the shafts.If there's not enough clearance to mount the fully inflated spare tire, put it aside and turn the jack handle a few more times to raise the car body.The next key step is to tighten the lug nuts in the proper order:Take the lug nuts and spin them onto the shafts with your hands. Use the lug wrench to turn them so that they all rest against the wheel, but don't tighten them down yet.Lower the jack so that the tire just rests on the ground.Tighten one of the lug nuts well. Give it one good turn with the wrench, but don't crank it on. Next, go to the nut opposite to the one that you've just tightened, and tighten in the same way. Tighten the remaining nuts in the same way. If you have five nuts, tighten every other one until they're all tight.Lower the car and pack it all upAll right, get back on the road!Turn the jack handle the other way to fully lower the car. As the weight is taken off, the jack will fall over. Lay it on its side and finish turning the handle, until the jack is fully closed.If the wheel has a hubcap or plate, replace it by holding one edge in place, and banging on the opposite edge with the jack handle, the heel of your hand, or the side of your fist.Put the old wheel and tire in the spare's compartment, or on the spare's bracket and secure it. Secure the jack and handle to their original location. Throw the tarp in the trunk, and carefully step around to the driver's door. Watch for passing cars!Reading Your TiresWOMEN NEED TO KNOW ABOUT CARS IF THEY DRIVE OR NOT :)When it’s time to replace your tires, you have to know what brand and type you want, as well as their size. This information is printed on the sidewall. Brand name and tire name are easy enough to find -- sometimes they're even printed in raised white letters.Tire size is measured in a combination of millimeters, letter codes and inches. The size of the tire pictured above is: P205/60SR15. The first letter is "P" for passenger tire. The first number is the tire’s width in millimeters -- in this case 205mm. The second number is its aspect ratio -- the ratio of sidewall height to width (also known as "profile"). In this case the sidewall height is 60 per cent of 205mm -- or 123mm. This tire is speed-rated, so the second letter is the speed rating -- in this case it’s "S" (112 mph).Speed ratings give a general idea of a tire's overall performance characteristics -- a family sedan needs no more than an "S" rated tire, while a Ferrari will use a "Z" rated tire. Tires with high speed ratings are more expensive and shorter-lived than tires with low speed ratings. Speed ratings use the following letter codes:The next letter is "R" for radial construction -- a superior design to the bias ply tires of old.The last number designates the wheel diameter -- this tire mounts on a 15-inch wheel.Printed together following the size designation. This tire's size is:Sometimes a load index and a speed rating are p P205/60R15 85S. "85S" means that this tire’s load index is 1135 lbs. and it has a speed rating of "S." This means that four tires can safely carry a maximum weight of 4540 lbs. (4 tires x 1135 lbs.) at 112 mph. This is something most drivers never have to worry about, but here’s a sampling of some load ratings:Some light truck tires use a different sizing systemThis tire's size is LT 31X10.5R15. The first two letters stand for "light truck." The first number is the tire’s diameter in inches -- in this case, 31-inches. The second number is its width in inches, 10.5-inches. The "R" stands for radial. The 15 designates wheel diameter -- this tire is made to fit on a 15-inch wheel.--------------------------------------------------------------------------------The very small type on the tire's sidewall contains the following information:Uniform Tire Quality Grades are also printed on the sidewall. These grades are a result of government mandated tests that measure treadwear, traction and temperature resistance. The actual testing and grading is done by the manufacturer, so take these ratings with a grain of salt.Treadwear measures how long the tread should last compared with a reference standard of 100. A treadwear rating of 400 means that the tread wears four times as well as the standard. This grade is only accurate for comparing tires within a certain brand.Traction is a measurement of a tire's ability to stop in a straight line on a wet road. The highest grade is AA; A is good; B is intermediate; and C is the worst.Temperature measures a tire’s ability to withstand the heat build up caused by prolonged high speed driving, underinflation, or overloading. The highest grade is A; B is intermediate; and C is the worst.M + S: Means the tire has the minimum required mud and snow traction.Maximum Load: Maximum weight that the individual tire can support -- shown in pounds or kilograms.Maximum Inflation Pressure: Shown in psi (pounds per square inch) or kPA (kilopascals). Never inflate your tires over the maximum inflation pressure.D.O.T. Serial Number: Shows compliance with Department of Transportation regulations along with the coded name of the tire manufacturer and the place and date of manufacture. The date of manufacture is shown by the last three digits of the serial number -- if it ends in 405, that means the tire was made in the fortieth week of 1995. Because rubber can dry out and deteriorate, tires that are extremely old can be more prone to failure than newer tires.Tire Construction: Shows the number and type of plies (interwoven belts) which make up the tire's tread and sidewall.Change Your Own Oil
"Forty bucks for an oil change!?!"Yes folks, forty bucks buys a whole lot of cornflakes. That's one of the major reasons why so many people change their own oil. There's a small initial investment for supplies, but you'll make that back the first time you do it yourself. Just ask your Great-Uncle Leopold if he ever had a stranger change his jalopy's oil, then watch his face change color three times in twenty seconds as he realizes that you're serious."Does my oil even need to be changed?" you ask. Manufacturer's recommendations are once every 3,000 to 7,500 miles, depending on the car. Most folks change it once every 6,000 miles. Conventional wisdom says that changing more often is better, but some experts now disagree.Changing oil can be a messy job, so wear old clothes and have some hand cleaner handy. Make sure that your car is parked on a level grade, rather than on any sort of hill or inclined driveway. You'll need some place to take your old oil, so call a few gas stations or town hall to find out who recycles used oil.Warm oil drains more easily than cold oil, so run your engine for just a few minutes before you start. But be very careful: Don't let the oil get too hot, as some may splash on you.Choose your oilMotor oils are defined by grade. Today's oils are generally multi-grade, which means that they are suitable for use in a range of temperatures.For instance, when an oil is specified as "10W40," the first number is a measure of viscosity (resistance to flow) at lower temperatures, while the second number is a measure of viscosity at higher temperatures. A rating of "5W30" would indicate an oil that flows more easily at both low and high temperatures than a "10W40." In short, the higher the grade, the thicker the oil.Many people prefer heavier oil (greater viscosity) for protection in hot weather and lighter oil (lower viscosity) for use in freezing temperatures. The best selling grades in the U.S. are 5W30 and 10W30 oils. If you're still unsure, read over the owner's manual again or consult a local mechanic.Position the carAgain, make sure that you're on level ground, and that there are no cats sitting on top of your nice, warm engine block.Set the metal ramps in front of your front tires, and drive your car up onto them. It can help to have a friend around to tell you when to stop.Set your emergency brake. If you have a manual transmission, put the car in first gear. If you have an automatic, set it to Park. Place the wheel blocks under the rear wheels to prevent any chance of the car rolling back.Drain the old oilAgain, watch out for hot oil! It's not a bad idea to wear safety glasses or even prescription glasses.Take your wrench and shallow pan and crawl under the car. Find the oil plug under the engine block that unscrews on the underside of the oil pan.Place the shallow pan under the plug and unscrew the plug (counter-clockwise) with the wrench. (If the wrench slips and starts to round off the bolt head, try a socket wrench instead.)The oil will stream out rapidly, so be careful. Chances are, the plug will fall into the pan along with the oil. Don't worry when it happens.When all the oil has drained into the pan, fish out the plug (here's where rubber gloves come in handy) and screw it back in. Tighten it firmly, but not so hard that you strip the threads.Change the filterAlways change the filter whenever you change the oil. Clean oil + a dirty filter = dirty oil.You'll be able to access the old filter from either above or below the car. Place the oil filter wrench around the filter's body. It will tighten itself up when you turn the wrench counter-clockwise to remove the oil filter.The old filter may stick initially, but will then unscrew easily. Unscrew it completely and carefully put it aside. It will be full of oil. Dip your fingertip in the old oil (convenient) or take a few drops from a new quart of oil (cleaner). Use it to lubricate the circular edge of the new filter, where it will contact the metal engine surface. Screw the new filter in with your hand, and tighten it firmly without overtightening--one quarter turn after snug.Finish it upYou're almost home! All you have to do is add the new oil and clean up.On top of the engine you'll find a knob that says "oil." Unscrew it and pour in the amount and type of oil recommended for your car. Look in your manual for the location of the knob if it's not obvious. Save the bottles for the disposal of the old oil. Screw the knob back on and wipe the area clean with the rag. Close the hood and start the engine.With the engine running, carefully check around the filter for any leaks. A leak will appear as some seepage at the oil filter connection or on the filter. If there is a leak, tighten up the oil filter a little more. If no leaks are found, back the car off of the ramps. Pour the oil out of the pan, and using the funnel, transfer it to the empty oil bottles or milk containers. Take the used oil to the motor oil recycler that you found (you did find one, right?).Note:Don't under any circumstances pour the oil down a drain, or in the street, or put it anywhere but in a proper recycling area. Poorly placed oil can be a serious environmental hazard -
as school begins we need to remember the importance of being and staying healthy...wash your hands
8:24 PM PST, 7/27/2009
as school begins we need to remember the importance of being and staying healthy...wash, wash, wash your hands...
A large percentage of hygiene products nowadays are labeled as germicidals or antibacterials. The companies who made these products promote the idea that being hygienic means being "squeaky clean". And the idea of getting bacteria anywhere has scared consumers into thinking that antibacterial soaps or hand sanitizers are must-haves. Some have been "brainwashed" into thinking they have to wash their hands or douse their hands with pocket sanitizers every 15 minutes. Or everytime they shake a stranger's hand. This propaganda have already made us fear each other as much as we fear these invisible invaders. And for what reason? Sales. Scaring the consumer market into buying your products does sound like an effective market plan, if you ask me. After all, it did work.
Scientists have studied the effects of using antibacterial products more often than necessary. A U.S. Food and Drug Administration committee documented that it "often is not clear what contribution consumer antiseptics make relative to washing with plain soap and water". Furthermore, in 2005, they found no medical studies that suggest there was any link between a specific antibacterial product and a decline in rates of infection.
The Emergence of Superbugs
One of the reasons why antibacterial products should be regulated is the possibility of the emergence of antibiotic-resistant bacteria or superbugs. Try recalling your high school lessons about natural selection or, more appropriately, "survival of the fittest". By using antibacterial soaps, what you end up doing is getting rid of the bacteria that are too weak to withstand its antiseptic effects (see Figure below). But not all bacteria are destroyed in the process - those that survived are the ones who resisted your antiseptic soap. What happens next? These remaining bacteria will reproduce. You will then end up with bacteria that are mostly antibiotic-resistant. Repeat the process over and over again and you will someday end up with bacteria that will resist ANY antibiotic known to man - these are the so-called superbugs.
A Call for Rationality
So how do we prevent the emergence of these so-called superbugs? There are a lot of ways we can prevent this. After all, despite all the medical challenges we’ve had in the past centuries, we’re still not extinct aren’t we? Here are some of the steps we can take:
Live healthy. Most people fail to realize that the best way to battle these invaders is to strengthen our immune system. Living healthy does not necessarily mean you have to live in an airtight bubble. Eat healthy food, get your daily dose of vitamins and minerals, and exercise regularly. If you divert your effort to strengthening your own bodily fortresses, you need not bother buying the "most effective" antibacterial soaps out there.
Studies have shown that washing your hands with plain soap is just as good as using an antibacterial soap. You only need to scrub properly. Also, some of the chemicals used in antibacterial products are more harmful than they are beneficial. One good example would be triclosan. Triclosan not only does harm to the environment, but also to your body. It is considered to be an endocrine disruptor that affects your thyroid gland and acts on sex hormones (estrogen and androgen).
Go natural. If you really need to keep antibacterial agents within reach, there are some essential oils with bacteriocidal properties, like Australian tea tree oil, pine oil and grapefruit seed extracts. Select products that use those as ingredients instead of those hard-to-read chemicals you commonly find in antibacterial soaps. If you can’t find any soap in the market that use those ingredients, do as I do. Make your own soap! Not only will it be cheaper, you’ll also have complete control over what chemicals are in your soap. You can find a natural “antibacterial” soap recipe in our Super Soap Recipes page.
Last but not the least, be rational. Look at bacteria the same way our friend Antoni did when he first beheld the millions of organisms living inside a drop of water. Respect them but do not fear them.
Hand washing: An easy way to prevent infection
Hand washing is a simple habit that can help keep you healthy. Learn the benefits of good hand hygiene, when to wash your hands and how to clean them properly.
the mayo clinic
Hand washing is a simple habit, something most people do without thinking. Yet hand washing, when done properly, is one of the best ways to avoid getting sick. This simple habit requires only soap and warm water or an alcohol-based hand sanitizer — a cleanser that doesn't require water. Do you know the benefits of good hand hygiene and when and how to wash your hands properly?
The dangers of not washing your hands
Despite the proven health benefits of hand washing, many people don't practice this habit as often as they should — even after using the toilet. Throughout the day you accumulate germs on your hands from a variety of sources, such as direct contact with people, contaminated surfaces, foods, even animals and animal waste. If you don't wash your hands frequently enough, you can infect yourself with these germs by touching your eyes, nose or mouth. And you can spread these germs to others by touching them or by touching surfaces that they also touch, such as doorknobs.
Infectious diseases that are commonly spread through hand-to-hand contact include the common cold, flu and several gastrointestinal disorders, such as infectious diarrhea. While most people will get over a cold, the flu can be much more serious. Some people with the flu, particularly older adults and people with chronic medical problems, can develop pneumonia. The combination of the flu and pneumonia, in fact, is the eighth-leading cause of death among Americans.
Inadequate hand hygiene also contributes to food-related illnesses, such as salmonella and E. coli infection. According to the Centers for Disease Control and Prevention (CDC), as many as 76 million Americans get a food-borne illness each year. Of these, about 5,000 die as a result of their illness. Others experience the annoying signs and symptoms of nausea, vomiting and diarrhea.
Proper hand-washing techniques
Good hand-washing techniques include washing your hands with soap and water or using an alcohol-based hand sanitizer. Antimicrobial wipes or towelettes are just as effective as soap and water in cleaning your hands but aren't as good as alcohol-based sanitizers.
Antibacterial soaps have become increasingly popular in recent years. However, these soaps are no more effective at killing germs than is regular soap. Using antibacterial soaps may lead to the development of bacteria that are resistant to the products' antimicrobial agents — making it even harder to kill these germs in the future. In general, regular soap is fine. The combination of scrubbing your hands with soap — antibacterial or not — and rinsing them with water loosens and removes bacteria from your hands.
Proper hand washing with soap and water
Follow these instructions for washing with soap and water:- Wet your hands with warm, running water and apply liquid soap or use clean bar soap. Lather well.
- Rub your hands vigorously together for at least 15 to 20 seconds.
- Scrub all surfaces, including the backs of your hands, wrists, between your fingers and under your fingernails.
- Rinse well.
- Dry your hands with a clean or disposable towel.
- Use a towel to turn off the faucet.
Proper use of an alcohol-based hand sanitizer
Alcohol-based hand sanitizers — which don't require water — are an excellent alternative to hand washing, particularly when soap and water aren't available. They're actually more effective than soap and water in killing bacteria and viruses that cause disease. Commercially prepared hand sanitizers contain ingredients that help prevent skin dryness. Using these products can result in less skin dryness and irritation than hand washing.Not all hand sanitizers are created equal, though. Some "waterless" hand sanitizers don't contain alcohol. Use only the alcohol-based products. The CDC recommends choosing products that contain at least 60 percent alcohol.
To use an alcohol-based hand sanitizer:
- Apply about 1/2 teaspoon of the product to the palm of your hand.
- Rub your hands together, covering all surfaces of your hands, until they're dry.
If your hands are visibly dirty, however, wash with soap and water, if available, rather than a sanitizer.
When should you wash your hands?
Although it's impossible to keep your bare hands germ-free, there are times when it's critical to wash your hands to limit the transfer of bacteria, viruses and other microbes.
Always wash your hands:
- After using the toilet
- After changing a diaper — wash the diaper-wearer's hands, too
- After touching animals or animal waste
- Before and after preparing food, especially before and immediately after handling raw meat, poultry or fish
- Before eating
- After blowing your nose
- After coughing or sneezing into your hands
- Before and after treating wounds or cuts
- Before and after touching a sick or injured person
- After handling garbage
- Before inserting or removing contact lenses
- When using public restrooms, such as those in airports, train stations, bus stations and restaurants
Kids need clean hands, too
You can help your children avoid getting sick by insisting that they wash their hands properly and frequently. To get kids into the habit, teach by example. Wash your hands with your children and supervise their hand washing. Place hand-washing reminders at children's eye level, such as a chart by the bathroom sink for children to mark every time they wash their hands. Make sure the sink is low enough for children to use, or that it has a stool underneath so that children can reach it. Tell your children to wash their hands for as long as it takes them to sing their ABCs, "Row, Row, Row Your Boat" or the "Happy Birthday" song. This works especially well with younger children, who may rush when washing their hands.
Older children and adolescents also can use alcohol-based hand sanitizers. Younger children can use them, too — with an adult's help. Just make sure the sanitizer has completely dried before your child touches anything. This will avoid ingestion of alcohol from hand-to-mouth contact. Store the container safely away after use.
Hand washing is especially important for children who attend child care. Children younger than 3 years in child care are at greater risk of respiratory and gastrointestinal diseases, which can easily spread to family members and others in the community.
To protect your child's health, be sure your child care provider promotes sound hygiene, including frequent hand washing or use of alcohol-based hand sanitizers. Ask whether the children are required to wash their hands several times a day — not just before meals. Note, too, whether diapering areas are cleaned after each use and whether eating and diapering areas are well separated.
A simple way to stay healthy
Hand washing doesn't take much time or effort, but it offers great rewards in terms of preventing illness. Adopting this simple habit can play a major role in protecting your health.
-
just say NO to store bought soaps!!!
9:26 PM PST, 7/26/2009
the cold hard truth about store bought soaps
Much of the soap available in the store today is not really soap at all, but a detergent. Detergents are a petroleum based product, like gasoline and kerosene. Have you ever noticed how regular soap leaves your skin feeling dry, itchy and tight? Alkali, the most common irritant in soap is often the culprit. Others ingredients in mass-marketed soap have been proven harmful to human health and can cause severe skin irritations in some people. These include ingredients such as DEA, Isopropyl Alcohol, BHT and Triclosan (commonly found in anti-bacterial soap). The most common ingredient in conventional bar soaps is sodium tallowate. It is the natural product of combining tallow, or beef fat, with lye. The attractiveness for tallow for mass producing soap is that it processes quickly, produces a hard bar of soap and is cheap and plentiful.
Benefits Of Handmade Soap
Evidence abounds of the healing properties of a handmade bar of soap. Those who suffer from skin conditions such as psoriasis and eczema, as well as people that have sensitive skin or are hypoallergenic often find immediate relief by switching to handmade soap. Compared to store bought soap, handmade soap is very mild. They are often made from vegetable-based oils, such as olive, coconut, and palm and do not contain the potentially harmful chemicals found in conventional bar soap. One of the biggest differences between commercial soap and handmade soap is glycerine. Glycerine is a clear liquid that absorbs water from the air and is a key factor in keeping skin soft and healthy. Glycerin soap is especially good for sensitive and delicate skin, and for children. Because it is a high quality by-product in the soap making process, many mass commercial soap manufacturers often extract the glycerine and sell it as a by-product to be used in higher priced products like lotions and skin creams.
Handmade Soap Is Good For Your Body
For adults, the skin covers approximately 20 square feet of the human body. It is the largest human organ and is the bodies first line of defense against dehydration, temperature, infection and harmful substances. Handmade soaps give your skin the care it deserves and make bathing a gentle, soothing experience.
Handmade Soap Is Good For Your Mind
For many of us today, life seems to move at an often hectic pace. While the stress of everyday life increases, personal time is at minimum. A fragrant, handmade bar of soap is a simple indulgence that fosters a feeling of relaxation and being pampered. Treat yourself or someone you love to the benefits of handmade soap!
-
water, water, water, what are the benefits of drinkin' water?
5:52 PM PST, 7/23/2009
The benefit of drinking water for health and younger looking skin has often been stated. However, is drinking several glasses of water daily essential for healthy skin care?
Many have stated that the benefit of drinking water in large amounts is to produce skin that is healthy and younger looking. However, is this a myth or a fact?
Drinking an adequate amount of water daily is important for overall good health because water is involved in and helps improve many bodily functions. These functions include digestion, absorption, circulation, and excretion. There are other more specific benefits for drinking water as well.
Water assists in the flushing or removal of harmful toxins from the body. If the body does not have sufficient water, then metabolic wastes will not be removed as efficiently as they should. In essence, the body would be holding in toxins instead of expelling them as is required for proper health. Much of this toxin removal is performed in the kidneys. Therefore, the benefit of drinking water in this case is to allow the kidneys to perform their task properly.
Another benefit of drinking water is to carry nutrients into the cells of the body. In addition to helping nutrients get into the cells where they are needed, the benefit of drinking water in adequate amounts also helps to keep the cells well hydrated so they can function properly and efficiently.
Drinking water is also beneficial for muscles. It helps maintain proper muscle tone and prevents painful muscle cramping.
The prevention of kidney stones or at least the reduction of risk of developing kidney stones is another benefit of drinking water in the right quantities.
Drinking water helps to increase the energy level in people and helps to lubricate the joints in the body.
There is a belief that one benefit of drinking water in large amounts is that it curbs the appetite and therefore can be an effective tool for weight loss. Unfortunately, there is no solid evidence that water plays this role. Certainly, drinking water in large amounts will fill the stomach, but this is only temporary. Once the water exists the stomach, the hunger sensation returns, perhaps with even more strength.
Benefit of Drinking Water for the SkinThe benefit of drinking water in large amounts for proper skin health is a controversial area. Many believe and have stated that water is very beneficial for proper skin care. The main stated benefit is that drinking a large quantity of water keeps the skin hydrated and prevents dry skin. Claims are also made that drinking water gives the skin a radiant, healthy, younger looking complexion with no wrinkles, and allows skin to maintain its elasticity and suppleness.
However, many experts are now refuting the above-mentioned benefits. Unless the individual is severely dehydrated, drinking large quantities of water will not prevent dry skin. Basically the moisture level of skin is not determined by internal factors. Instead, it is external factors such as skin cleansing, the environment, the number of oil glands, and the functioning of these oil-producing glands that determines how dry the skin is or will become. The water that is consumed internally will not reach the epidermis. In fact, the water moves through the body system rather quickly. If the skin is dry, the best solution is to treat the skin from the outside with a suitable and dry skin moisturizer or dry skin lotion. This forms an effective barrier to water loss from the skin.
It appears there is no significant benefit of drinking water to cure or prevent dry skin. How about spraying or misting water on the skin to help reduce dryness? This once again is a treatment where there are significant differences in opinion. Some argue that misting water on the skin will help hydrate it and help prevent dryness and skin aging. Others argue that water misting has no significant hydrating effect. This latter opinion appears to be the truth. It is best to prevent moisture from escaping the skin in the first place with proper moisturizers rather than wetting the skin constantly. However, it is important that the environment is not dry. Moisture in the air will limit the amount of water escaping from your skin compared to a dry environment where water will be more readily drawn out of the skin.
Is there any real benefit of drinking water for skin health? Actually, although combating dry skin is not a benefit of drinking water, there are some other potential benefits.
As mentioned, drinking water in adequate amounts is necessary to flush out toxins out of the body via the excretory system. With inadequate amounts of water flowing through the body, these toxins can build up in the body and escape through skin pores. This contributes to acne. Therefore, by flushing the body internally with water, acne breakouts are less likely to occur due to toxin release through the skin.
Another benefit of drinking water in large amounts for the skin is in the treatment of skin disorders such as eczema and psoriasis. In addition, proper hydration will help to eliminate sunken eyes and circles under the eyes. Skin plumpness is also sometimes stated as a benefit of drinking water.
Drinking Water RecommendationsThe benefit of drinking water for the skin and body is determined by the amount of water consumed. Most of the recommendations in the literature suggest that eight glasses of water should be consumed per day to obtain the maximum benefit of drinking water. Some claim that the best benefit of drinking water occurs when fresh distilled water is consumed as opposed to tap water. Tap water can be inconsistent in composition and can contain unwanted minerals and additives. Spring water is also questioned by many because of the possible presence of contaminates and pollutants. However, there is no agreement on this and opinions vary widely in terms of the proper water type choice. As long as the water is clean, then it is acceptable.
The suggestion of drinking eight-8 ounce or 250 ml glasses of water per day (the so-called 8-by-8 rule) is an interesting one because it does not seem to have any basis in science. It is a rule often quoted, but difficult to trace back to a medical or scientific study. In addition to the 8-by-8 rule, recommendations often include to avoid dehydrating foods and beverages such as coffee, tea, cola, other caffeine containing drinks, and alcohol.
However, many believe that 8 glasses of water is overkill and the same benefits of drinking water can be obtained with smaller quantities. Some specialists suggest that for an average-sized adult in good health, with healthy kidneys, and living in a temperate climate, only four glasses of water is required to obtain the benefits of drinking water and to replace daily water losses.
The water does not have to be in the form of distilled water, bottled water, or tap water. Water to hydrate the body can be obtained from eating water-rich fruits such as melons, vegetables, and foods. It is believed that water in foods stays in the body longer and has a better chance of being absorbed, whereas liquid water exits the stomach quickly and gets expelled quickly before proper absorption is able to occur. Beverages such as milk and juice also contribute to the daily water intake total. Even beverages that are said to dehydrate are useful according to research. Caffeinated beverages, do dehydrate the body to some extent, but this is more than compensated for by the amount of water in the beverage. A cup of coffee actually adds about two-thirds of a cup of hydrating fluid. Therefore, drinking a cup of coffee will add to your water intake total.
Alcoholic beverages when consumed result in a net loss of water in the body. One drink may not make too much of a difference, but several will cause noticeable dehydration. If consuming alcohol, it is best to drink water as well to keep hydrated.
Because of all the uncertainty about the benefit of drinking water and how much water should be consumed daily, there is no clear course of action. The best strategy is to be reasonable. Be aware of what your body is telling you. If you lack energy, are constantly thirsty, and have dark urine then this could be a sign that you are not getting enough water. Thirst is the body’s way of signalling a need to increase water intake. So pay attention to this warning sign. If you are running to the bathroom every hour then perhaps you are drinking too much. An average healthy person should be passing urine 3 to 4 times per day. If this is the case, then the body is likely to be well hydrated.
When exercising and sweating there is a need to replace the lost water regularly in order to prevent dehydration and heat sickness. The same is true when residing in hot climates. In these situations, the benefit of drinking water is obvious. Certain illnesses also require extra hydration. The benefit of drinking water in larger amounts than normal also extends to pregnant and breastfeeding women, which are conditions where the body requires more fluid intake.
For older individuals, drinking more water is a good idea, since dehydration is more likely to occur due to physiological changes in the body and general lack of awareness when it comes to hydrating the body.
Drinking water for the proper health of individuals is not universal. For some it may actually be dangerous. For people who have trouble eliminating fluids (diabetics taking anti-diuretic hormone), the excess water intake cannot be eliminated and water intoxication may develop. Signs of water intoxication include mild headaches, confusion, coma, seizures, and maybe death. Individuals taking this medication should consult with their physician prior to increasing their water intake significantly.
-
what's the big deal about shea butter, goat's milk, and olive oil?
8:08 AM PST, 7/21/2009
what's the big deal about shea butter, goat's milk, and olive oil
kewl stuff about shea butter
According to the American Shea Butter Institute, not only is Shea Butter known to be an excellent moisturizer for the face, body & hair, but it has healing properties as well. The Vitamin A in Shea Butter is important in improving a number of skin conditions, including blemishes, wrinkles, eczema & dermatitis. Additionally, premium Shea Butter cream has properties that can treat skin allergies (bug bites, poison ivy & poison oak), frostbite, sunburns and razor burns, and many other skin conditions. The Vitamin E in Shea Butter may help in anti-aging and be an anti-free radical agent, but more testing needs to be done. Unrefined shea nut butter has been found to act as a natural SPF of approximately 6. As you can see, Shea Butter is valuable for more than treating, itchy, dry skin, it can help heal small skin wounds and has been found to even have anti-inflammatory properties for those tense, sore muscles.
Shea Butter is a fatty extract derived by crushing the seed of the Karite tree, or TREE OF LIFE. Native to Africa, it grows wild in the semi-arid Sahel region of West Africa. Many women in rural areas there make a more comfortable living for their families by making Shea Butter available to the rest of the world for it's amazing, all-purpose cosmetic and healing benefits. So much so, that it has been called "women's gold" for the economic benefit it brings directly to some of the poorest places in the developing world. Not many other developing countries can boast the same. In comparison, even without depressed prices in the world market, coffee, cocoa & cotton when exported as commodities tend to yield their benefits to the governments, corporations or middlemen. Shea Butter production and export are incredibly important in increasing access to global markets for poor, working women in a world where the majority of producers tend to be men and anything but poor, because the collection of shea nuts and the crushing of them into butter is considered women's work.
awesome info about goat's milk
For thousands of years Milk has been used in a variety of skin care products. The most famous perhaps being Cleopatra, who is said to have preserved her renowned beauty that snared Mark Anthony by bathing in the milk of goats and horses. The soothing and moisturizing qualities of goat milk have been revered for centuries for it's gentleness to even delicate, damaged skin. So much so that the Greeks and Romans used milk products to treat skin injuries. In nineteenth century Europe, whey (the watery part of milk separated from the curd in the cheese making process) was a sought after therapy for skin in spas. From ancient times to today, milk and milk products have been an excellent source for nutrition, medicine and cosmetics. Goat milk is known to be well tolerated by those with allergies to cows milk, even those who react adversely to soy milk replacements. Due to it's high fat content, it lends itself well to the soap making process. Higher fat content translates directly into a better moisturizing cleanser. Because of Goat Milk's low pH, the alkalinity of soap is reduced preserving the acid mantel which healthy skin uses to reduce bacterial invasions. Some Dermatologists recommend Goat Milk Soaps to heal skin conditions such as psoriasis, eczema and acne, as well as gently relieving dry, itchy skin.
a little somethin'~somethin' about olive oil
Olive oil is used as an anointing oil by Christians and Jews alike. The ancient Greeks and Jews used it to anoint their kings or athletes. To those who follow Islam, the prophet Muhammad advised his followers to apply it to their bodies. It has also been used for every day health measures and is generally non-commedogenic (won't clog pores). The Greeks used oil to clean their bodies. In lieu of soap at the baths, olive oil was applied to the body then scraped off with special tools. In the time of Muhammad, putting oil on the hair may have been considered a health measure as it discouraged lice and seborrheic dermatitis (dandruff). Olive oil on the body may help prevent dry skin conditions and eczema and is a mild antibacterial agent just like your natural skin oils.
melt and pour soap base...go on...getcha some :)
-
what exactly is aromatherapy?
7:45 AM PST, 7/16/2009
What is Aromatherapy?
Aromatherapy is a therapeutic natural practice that can be used to advance health, beauty and a sense of ease. It involves using pure essential oils with various methods, including bathing, inhalation and massage. Aromatherapy is derived from two words: Aroma means scent and Therapy means treatment. This scent/treatment has evolved over the centuries and across continents.Aromatherapy works in harmony with your body. Side effects from properly administered dosages are absent. Your body becomes stronger as it’s fed the complex nutrients of purity from essential oils, not something synthesized in a lab and deprived of all its components. There are no new essential oils—only the same, reliable plant life that has been used successfully for thousands of years. Combining the rich and fragrant oils of rose, jasmine and neroli, for example, may appear to be a new twist to you, but guaranteed this expensive blend of floral oils have been utilized for an individual with an overactive mind [stress!] some other time and place.
A Brief History Of Aromatherapy
Before 1993 you wouldn’t have been able to find the word ‘aromatherapy’ listed in a dictionary even though this art/science has been effectively used for thousands of years. In fact, the word was invented in the 1920’s by a French chemist by the name of René-Maurice Gattefossé who studied the cosmetic properties of plants. He soon learned that plants contained organic antiseptic elements that worked better than inorganic antiseptics. His interest was further ignited when he there was an explosion in his laboratory; badly burning has hands. Immediately he poured lavender essential oil [one of the few essential oils that can be applied directly on the skin] on them and made the not so astonishing discovery that his hands healed quickly and with no scarring.However, the usage of aromatic plants has been going on for thousands of years. From the civilizations of ancient Egypt, India, China, Greece, and Rome, floral and herbal oils have been used in all manner of ways from flavoring food and beverages to being poured into baths and massaged into the body.
The Romans weren’t shy about employing scents. They inundated their baths and banquets with floral concoctions from scattering rose petals on floors to anointing their bodies with floral perfumes. After bathing their bodies were massaged with aromatic oils. Their beds and clothing, bodies and hair were scented with perfumes. Even men scented themselves with balsam and cinnamon oils.
The natural healing system of ayurveda, meaning “science of life” was established approximately 4000 years ago in the Himalayan region. Plants and all their properties are a relevant part of ayurvedic medicine that continues to be practiced where it started and has now spread around the world. Hippocrates is known as the "father of medicine", and this Greek doctor was a noted advocate for the usage of essential oils, especially in the form of daily baths and massages. Resins of myrrh and oils of cinnamon were often applied to a patient to soothe inner and outer complaints.
Essential Oils vs. Fragrance Oils
Pure, unadulterated essential oils derived from the leaves, roots, seeds, flowers or bark of a plant or tree are the source extracted directly from nature via a form of steam distillation. When you first begin working with essential oils, take care in handling them. Lavender essential oil is quite safe for the skin, as is tea tree, but some people can have allergic reactions to them. When handling essential oils, it’s wise to do a skin test. Simply apply a tiny amount on your wrist, and if there’s no reaction within 24 hours you are safe. As these oils can be costly, you must take care that they’re always kept in a cobalt or amber colored glass bottle and stored in a cupboard [out of direct sunlight] and kept in a cool, dry place. When you buy an oil, write the date on the vial. Most essential oils can last from one to three years. Citrus oils have a shelf life ranging from six months to less than two years. Essential oils can last for several years, but the freshness disappears. There are some exceptions with the darker colored, “heavier” oils or resins. Patchouli is known to improve with age.It’s important to know about fragrance oils and what they really are. I visited an e-group for soapmakers and when someone asked for a company where they could purchase essential oils, a person gave the name of a company that sold only fragrance oils! Obviously, to this uninformed person, the terms are interchangeable. They’re not. Fragrance oils are synthesized in a laboratory. They are sometimes referred to as “nature identical.” If you’re looking for an inexpensive scent, then fragrance oils fit the bill. But fragrance oils are not therapeutic grade essential oils and never will be.
From personal experience, I’ve learned that sniffing an essential oil right from the bottle and diluting it with a carrier oil such as sweet almond or jojoba, makes a huge difference. I smelled my favorite, vanilla absolute, a thick balsamic oil derived from the pod of the vanilla plant. I determined that the first whiff brought out the usual vanilla scent I was accustomed to, but a millisecond later there was a stronger, harsher scent. I then added a few drops to a bottle of sesame oil and the change was magnificent! I had the aroma I equated with the spicy-sweet scent of a dried vanilla bean pod. The carrier oil had combined perfectly with the essential oil!
You should always dilute essential oils in carrier oils when applying directly to the skin, or even in the bathtub. This is a necessary safety precaution. Essential oils are very strong and need to be diluted. Also, some essential oils may smell good enough to drink, but are for EXTERNAL USE ONLY!
Aromatherapy In Your Environment
The methods described here are for those of you who wish to be able to change the fragrance environment of a room, car, office, closet, drawer, etc. There are psychological benefits to entering a room that has the crisp aroma of citrus, or a subtle scent of fresh blooming flowers.Aroma Lamps
Aroma lamps are either electric or operated by a tea light or votive candle. There is a small cup shaped portion that is usually made of glazed ceramic and holds a few ounces of water. However, other materials may include glass and stone. Warm or even hot water should be used; as that is less work the candle has to do. Only a few drops of essential oil are added to the water, thus making it ideal for costlier essential oils. Care should be taken to see that the water doesn’t boil away.Atomizers
Requiring no heat, atomizers, sometimes referred to as nebulizers or nebulizing diffusers, disperse the essential oils on a revitalizing current of air as it passes through an intricately engineered blown glass chamber. This course naturally suspends and ionizes the oil into extremely fine molecules, causing them to remain suspended in the air for longer periods.Many aromatherapist practitioners and others who utilize the finest essential oils choose atomizers. It’s important to be careful with the atomizers. Since there is a continuous mist emitted it should not be used for more than a few minutes at a time. Many of the models do have built-in timers to avoid any problems like overuse. Also, make sure that this is done in a clear area, away from furniture, [varnish can be worn off] wall hangings and other objects.
Candles
Candles create a more romantic ambiance and do double duty in helping disperse your preferred aroma[s] throughout a room. In the spirit of true aromatherapy, it’s advised to use beeswax, palm wax or soy wax candles as paraffin contains carcinogenic chemicals. Wicks should be trimmed, and the essential oils need to be added at the top of the candle, but never on the wick itself. You can add the essential oils after the candle has been lit and there’s a small pool of wax at the top of the candle. Don’t add the oils to the flame itself as oils can catch fire.Diffusers
You can buy diffusers to plug into your car’s cigarette lighter, as you can also find those that plug into any wall socket. The atomizers suspend a fine mist of essential oils into the air for aromatherapy is the best method of using essential oils for therapeutic treatments. Many aromatherapists believe that this is the most effective method of enjoying the aromas.Sachets
If you want your linens to smell clean and fresh, the addition of a smell sachet filled with your favorite aroma will create a pleasant smell whenever you open the drawer or closet. You can buy them already made, or make them yourself. Highly recommended would be a small muslin or organza bag filled with dried lavender buds and a few drops of lavender essential oil. Not only is lavender a universally pleasing aroma, it also serves as an all-natural way to keep moths away.Carrier Oils
The most common way to dilute a pure essential oil is with a cold-pressed carrier oil. Carrier oils allow the essential oil to slowly permeate the skin, protecting it from irritation. Jojoba, sesame, sweet almond, rose hip, refined rice bran, wheatgerm, evening of primrose, grapeseed, kukui nut, sunflower, hazelnut, safflower, avocado or apricot kernel oils are commonly used. Several of the carrier oils can be combined and when essential oils are added, this makes for a very nutrient-rich bath oil. -
i'm new to soap making..what do i need to know?
8:18 PM PST, 7/15/2009
hey to my newest soap makin' friend and thanks for your awesome question...i'm new to soap making...what do i need to know?...per your request this is the shortest...all rolled into one type summary i could come up with...i hope this helps :)...crystal
Crafting melt & pour glycerin soap looks effortless and is the perfect gift to give any time of the year. Better yet, why not just start making and selling it? Apparently, some over-enthusiastic people think that because glycerin soap is so easy to craft; it can be sold with little to no preliminary testing. After you’ve made your first batch you might be just beginning your way to rivaling Primal Elements, yet you’re nowhere near ready to sell.
Your Soap Base
Melt and pour soap base is premade. This means that you can buy a small amount, cut off a piece, and use it to wash your hands. However, most of us see this as just the first step into creating wonderful looking bars, slabs, domes, rounds, squares or rectangles of colorful and/or beautifully scented soap.This can only be done if your soap base is well made. How can you find out? First of all, stay away from soap base with a very long list of ingredients. Don’t purchase soap base that doesn’t have any ingredients listed. The manufacturer is required by law to list what’s in that soap base. If you’re shopping online, make certain that the ingredient list is posted on the web site. If not, go to another site.
Not 100% Glycerin Soap
Time and again I’ve read of people who claim they use 100% Glycerin soap. That’s impossible as it would be a jar of a clear, sticky plant-derived substance that’s devoid of lather and cleansing ability. What melt & pour soap contains is 100% plant glycerin – and usually at around a 20% rate. Some soap bases contain more, others less. But even at about 20% that is what helps this soap achieve its clarity and its softness – as well as its shorter lifespan in the tub, sink or shower.F.O. Versus E.O.
First off, learn what do these initials mean. F.O. = Fragrance Oil. E.O. = Essential Oil. Now, what’s the difference?A fragrance oil contains up to 200 components to make it smell like a fresh-baked slice of chocolate fudge brownie, a luscious ripe raspberry, or a just-picked jasmine flower. Fragrances often contain natural ingredients, but also a lot of synthetic ones. They’re created in a lab, and are less costly than essential oils. They are also more plentiful. Another advantage is that you can obtain your favorite perfume or cologne for just a few dollars an ounce!
Essential oils derive their substance directly from nature. Lemon oil comes from the expressed rinds of the fruit, rose essential oil is from the petals of this lovely flower, and sandalwood comes from the wood of the Indian, Indonesian or Australian-grown tree. Essential oils can be reasonably priced at only a few dollars per ounce [citrus scents], to more than $350 for Bulgarian rose otto from the Valley of the Roses or a ‘mere’ $197 for some skin healing Immortelle from the island of Corsica.
Don’t Add Fresh Fruit or Vegetables
Tempting as it may be, refrain from adding that pureed avocado. Don’t put in those dewy lavender or rose buds unless you want to see them turn brown before your eyes. A fresh slice of cucumber would look gorgeous suspended in a translucent bar of soap – until mold grows over it. Even if you sprinkle in Fruit Fresh or powdered benzoin, even if a book or online article instructs you to do so --- DON’T ADD FRESH FRUIT OR VEGETABLES. You can add dried herbs such as peppermint or rosemary, but expect them to turn brown within a few days or weeks. This is because glycerin soap contains up to 10% water. Water causes pretty dried lavender buds and green leaves to turn that color also.Test, Test, Test
No, you don’t have to take a test—not even a quiz! You just have to be sure of what you’re doing in the kitchen or soap room. You have to be comfortable making your soap before you sell even a single bar. Don’t have your first batch be a complicated multi-color embed project. Start with a simple soap shape and use one color and one scent. You have to be certain that the colors won’t run or fade. Will your fragrances hold up for more than a month? Does your soap sweat? Will that lovely white vanilla or coconut soap remain that color or will it turn chocolate brown in a matter of weeks?You are the first person to test your soaps. Then your family. Let a few friends, neighbors and coworkers in on your soaping hobby that may just turn into quite the business. Anticipate questions from testers/potential customers. Know the answers. Do this for at least six months, but a year is even better. Remember, you need to be happy with your products, as you’re now the soapcrafter.
The Business of Soap
When you plan to sell your handcrafted soap creations this entails naming more than each type of soap you make; you’ll become a business owner. For more information on this large and important aspect, there are several books you can read.good luck and happy soap making...remember to check out the rest of my blog for more helpful hints, tip, and tricks...if i can help you with anything else just let me know
-
being frugal, going green or going to far...you decide
7:47 AM PST, 7/14/2009
hey blogger friends...i'm always interested in different ways to save durin' these hard times...i want to thank everyone for sendin' their ideas to me...i'm not sure as of yet on how to take this but, i felt the need to pass it along and let you decide for yourself...is it simply bein' frugal?...is it another way of goin' green?...or is it goin' waaay tooo far?...let me know what you think...also send me your take on bein' frugal or goin' green...i'd love to hear from you!!!...crystal...i hope y'all have an awesomely wonderful day :)
RESUEABLE "RECYCLE" CLOTH MENSTRUAL PADS...i know...that was my first thought too...EEEwww~yuk~gross...however the more i think about it the more i'm thinkin' it might work...i'm just not sure it's for me...it's a little touch~&~go right now...the verdict's not in as of yet :p...don't discount it to fast...just give it a few cause the idea may grow on you...i have 2 patterns on how to make them...one was included with the article and i done a little search to find the other one
Before the 20th Century, most women used cloth pads or “rags” during their menstruation. Disposable pads didn’t become common in America until after WW II. Among rural and low-income women they didn’t catch on until the 1960’s. As with diapers, there have always been people who prefer cloth to disposable. Disposable pads do not biodegrade very quickly. Plastic diapers and sanitary napkins are likely to be two of the most common artifacts that future archaeologists will find when excavating landfills from the 20 and 21 Centuries. I wonder what kind of commentary this will be on our present lifestyles? Only time will tell.
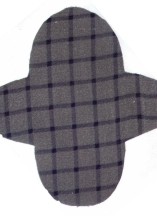
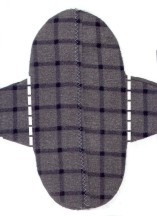
OUTER PAD WITH WINGS
Cut 2 with flap extended & 1 on fold with flap closedINNER PADS
Cut 2 of flannel and 1 or 2 of filling or more flannelPrinting Instructions: Set Margins to 0.25 or 1/4 inch each.
To make your own sanitary napkins you need the following supplies:
- A sewing machine with a zigzag stitch.
- Flannel: Old flannel shirts & baby blankets work beautifully but new flannel works fine too. Be sure to wash it in hot water before using to prevent shrinkage.
- Thread
- Snaps or Safety Pins
- Scissors
The Outer Pad
Begin by printing both of the patterns and cutting them out. The Inner Pad is a large oval. The Outer Pad is actually 2 patterns in 1. With the long straight side extended, it is the topside. You will need to cut 2 of these. With the long straight side folded in, it is the bottom side. Place the straight edge on a fold of fabric and cut 1 of these. Look at the pictures for examples.
Make 1/2-inch hem down the long straight side of each of the 2 top pieces. Straight stitch or zigzag stitch this hem, as you prefer. Now arrange the 2 upper layers of the outer pad over the lower layer. The front hems should overlap slightly, or by about 1/2-inch.
Zigzag stitch around the outside twice. If desired you may straight stitch down the dotted lines shown on the picture to the right. This allows the inner pad to fit more securely inside the outer pad and also makes folding the wings a bit handier.
Some women apply a snap or button to the wings at this time. Place them at points “A” in the illustration. Velcro is not advisable because it has a tendency to chafe. Personally, I don’t < like
like to go through all the work of applying snaps or buttons so I use a safety pin instead. Large diaper safety pins work beautifully for pinning the wings together. To the right you will see a picture of the pad pinned closed. The wings fit around your underwear just like disposable pads with wings. Some women wear the pad with the pocket seam facing down, next to their underwear. Other women prefer the pad placed with the seam-side next to their skin. Try it both ways to see which you prefer.
The Inner Pad
The inner pad is the absorbent part of the sanitary napkin. It slips inside the pocket of the pad. The beauty of this is that you can use as many inner pads as necessary for the rate of your flow. During heavy times, or overnight, use 3 or 4 Inner pads. For a lighter flow use only 1 Inner pad. For a panty liner, use the outer pad without an inner pad. The reason you use several layers instead of 1 very thick layer is because several thinner layers are easier to wash and have a shorter drying time. Additionally, the many exterior surfaces of the pad layers makes them more absorbent than a single thick pad would be.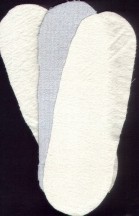
For the inner pad you want to cut at least 3 layers, maybe 4, depending on the thickness of your fabric. Use the same pattern for all of the layers.
 Use flannel for the 2 exterior layers of the inner pad. Use 1 or 2 layers of flannel or terry cloth, cotton quilt batting or another absorbent material for the interior layers of the inner pad. I used old flannel shirts, a flannel baby blanket and an old towel for my fabric. The towel was ripped and had a few holes. I used it as the interior layer of my inner pads. The flannel baby blanket was the exterior of the inner pads, and the flannel shirt was the outer pad, the part with wings.
After cutting out your layers for the inner pad stack them neatly. Zigzag stitch around the edges twice. Trim the edges if desired. I used dark thread in the picture so you could see it against the light flannel. Make 2 of these inner pads for each outer pad. They are very easy to cut and stitch, so you may want to make a few extras for heavy days.
After completing each part of the pad, slip the inner pad inside the pocket of the outer pad. Pin it in place and see how it feels. You will be surprised at how comfortable it is.
Place template on the fold of the fabric and line up with the fold line on the
template, cut one. Take the same template and cut 2 pieces from the full
template. Not on a fold. Cut about 8 pieces of fabric from the oval template.
This number depends on the thickness of the fabric.
Here are all the pieces cut out. My oval pads are 4
layers each. This is thick double napped flannel I'm using.
Serge around the edges of your pads and down the center
seam of the 2 separate body pieces. This prevents fraying of
the flannel
Take your two separate body pieces and place them over the
whole body piece, lining up the edges. Your two center seams
with overlap
Serge around the entire body.

Here's the body and the two pads.

Add a snap or two and you're almost done. I say a snap or two
because some underwear have different crotch widths. If you
add an extra snap you wont have extra wings hanging down
from your underwear.
I like to have extra protection so I take a quilted waterproof crib
pad and cut one oval liner and serge the edges. Once I did this,
I never ever had a leaking problem.
I put the waterproof pad in last so it's closest to the underwear.
I toss the soiled pads in a bucket of water on top of my
washer to soak. At the end of my cycle I pour the bucket into
the washer and spin out the water. I then do a regular wash
and dry them in the dryer.
Washing and Maintenance
When you make your own pads you have to wash them instead of tossing them into the garbage. Keep a small bucket of water with a lid in the bathroom, preferably out of the reach of children and pets. Add a spoonful of vinegar if desired. Remove the inner pad from the outer pad. Soak the used pads in the bucket of water. Drain the water into the toilet before washing the pads. The water can also be used to water house plants because they like all the extra vitamins and minerals. Make sure you use cold water so that the stains will come out. I wash every morning. Some women stash all of the used pads in a pillowcase or plastic bag and wash them all at once when their period is over. I don’t do this because I have a washer in the house and I find it more sanitary to wash them every day. They can drip dry or machine dry.If you do not have a washing machine, then they may be washed by hand. Run cold water over them in the bathtub to remove most of the blood. Place the pads in a medium bucket or tub. Add a little soap and cold water. Using a clean plunger, plunge the pads until they are as clean as you can get them. Plunge for a good 10 minutes for the best results. Rinse the pads well and squeeze them dry. Hang each pad by it’s own clothespin and they should dry pretty fast, even in the winter.
If you like, you can iron the pads, but do not use starch on them. Be careful not to use fabric softener either because it will make them less absorbent.
as for the "bucket" be creative...i don't think i could set an open bucket in my bathroom to let them soak...i would find somethin' with a lid...somethin' decorative...soak in cold water...i'm thinkin' i'd have to add somethin' to the water like borax or peroxide...kinda like cloth diapers
A No-Sew Alternative
If your sewing skills are lacking, or you simply do not want to go through the trouble of sewing your own pads you can try this instead. Purchase absorbent terry-cloth dishtowels. Wash them before using. Fold them into rectangles about 3 or 4-inches by 10 or 12 inches. Use safety pins to pin them into your underwear at both narrow ends (the front and the back). These are a bit bulkier than home-sewn pads. They are quite comfortable though, and are a legitimate alternative. They may be washed the same as home-sewn pads. I’ve also seen washcloths recommended. Fold them into thirds, or quarters (long ways) and fit them into your underwear. Apparently they stay in place without pinning because of the friction between the terry-cloth and underwear. For heavier flows fold together 2 or more wash cloths.About Fabrics
When I made these, I used fabrics I already had in the house. You may purchase new fabric instead if you like. Use a sturdy double-napped flannel if you go this route. It will last the longest and give you the best results. Cotton quilt batting is very nice filler, but you can also use additional flannel, which is less expensive. Wash everything before cutting or sewing. Flannel will shrink. After sewing, wash the pads again before using. This helps them hold their shape better. Men’s flannel shirts and flannel baby blankets make excellent flannel for your own menstrual pads. They can sometimes be found for 25¢ or 50¢ a piece at yard sales, which makes pads very cheap to sew at home. Brightly colored fabric is less likely to show stains than solid colored or light fabric is. I prefer to use patterns and dark colors for this reason.About the Pattern
I created this pattern free hand after measuring commercially available, disposable pads. My pattern is a little bit wider and longer than some patterns available on the Internet. This is to accommodate the average woman, who is a size 14 or larger. Standard pads and liners are created for a size-6 woman. Pads made from this pattern are less likely to leak because they are large enough to fit properly.Okay, But EEEwww . . .
I’ll admit, many people have this reaction the first time they consider homemade pads. It is weird. We never see anything about it on television so that’s the first sign that it’s NOT socially acceptable. Sewing and using homemade pads seems like something that only weird-os and freaks do, probably off in the woods somewhere, or maybe a nice cave in the wilderness where they can commune with nature and get in touch with the moon. Nice women would never use homemade pads. After all, your hands get wet and you have to touch your own body fluids which is kinda gross. Plus you have that icky bucket in the bathroom so everyone knows that you’re up to something sneaky. The whole idea is enough to make some women vomit and make some men run for cover in a sweaty, testosterone filled locker room.
Believe me, I sympathize. I had to get used to the idea before I became a convert. For some women the conversion process happens overnight. For others of us, it takes time. We have to go slow, talk it over with other women, learn a lot more about it, and try it secretly to see if it really does work (it does). If we have always hated pads, then homemade ones may seem like an even more uncomfortable way of dealing with a monthly necessity. Everyone may say cloth pads are more comfortable, but just because it works for them, doesn’t mean it will be the same for us. Besides, the bucket in the bathroom is just tooooo gross. And what if the husband sees them and laughs at them or thinks that we’ve lost our minds. What if the mother in law visits and sees the bucket and we have to explain it to her, or a visiting preacher’s wife, or worse yet, the Preacher?!!! Gee whiz, it all becomes such a statement, and honestly, this is not the type of statement that most of us want to make to the world.
Relax. Take a deep breath. It is less weird than it seems at first glance. Think about women from the past. Our hearty ancestors who pioneered this country; while they rode their covered wagons west, what did they use every month? What did Native American women use back when they owned the continent? What about Eve and her daughters? What did Sarah use? Well, Sarah was barren, so maybe she didn’t need them. But what about other women in the bible? Give it some deep thought. Queens and peasants, Pilgrims and Puritans, they all have one thing in common. They had to use something to catch their monthly flow.
The truth of the matter is that cloth pads are not weird. Disposable ones are. Disposable pads and tampons have been commonplace for less than 50 years. This means that pretty much all of the women who are currently menstruating have only been exposed to disposable choices for their monthlies. Pads or tampons seem to be the only option. This is very much a comment on our current society. We use everything once and then toss it away. Disposable feminine hygiene products are a big scam perpetrated by manufacturers who want to keep us on a leash so we have to keep buying their products. They are making as much as TEN to TWENTY Thousand dollars per woman over her lifetime. If you think of the millions of women in the USA alone, the profits are staggering!
At heart, I am a rebel. One of my goals in life is to be dependent upon as few manufactured products as possible. My life and my money are more valuable than that. My freedom is more valuable than that. I will not give myself over to disposable pads if there is a free or cheap alternative that gives ME control over my budget and my body. Modern consumerism is a crock. It is an illusion that makes us feel like we have a semblance of power over our lives, but really it’s just newspeak for letting commercialism and it’s attending obsessions consume us. Extricating ourselves from consumerism is frightfully difficult. The strings and layers it encompasses are sneaky little buggers that are hidden in all aspects of our lives. One of the ways that we can achieve more personal freedom and attain genuine control over our circumstances is to snip those strings every time we find a self-sufficient alternative. For me, this means turning to cloth pads exclusively.
I would rather get my hands wet than give Corporate America one more ounce of control over my budget or even more importantly, my body. There are so many things I have to buy that when I find something I can make for myself, it is reason for rejoicing.
Which brings us back to that bucket. An ice cream bucket with a lid works great. I keep mine under the bathroom sink so it’s not a topic of conversation. Most women keep their disposable products in the bathroom, and the bucket is the same thing. Stash it in a private place and don’t give it a second thought. When I drain the bucket in the mornings, I do it in the bathroom while I’m already in there and no one is the wiser. As I start the first load of laundry for the day, I dump the rinsed pads in there and they wash up with whatever else is in the laundry. The wet pads cannot contaminate the other clothes in the washer. Dirty clothes are dirty clothes. Mud, dust, grime, dishcloths that have been used on bloody noses, rags used to wipe up the floor, it all comes out in the wash. The clothes in the washer are getting clean and one type of dirt will not give cooties to another type of dirt. After the washer has run it’s cycle, all the laundry is clean and ready to start its life anew, sort of a fabric version of baptism.
I live in a house with boys. They are blissfully unconscious of what the bucket is for. They don’t even ask. When they help fold the laundry, they just put the clean pads in the “Mommy Pile” and assume it is part of the world of women that they don’t want to know about. When the boys were younger, and I had to wash my pads by hand with a clean plunger, I did it in the bathroom as part of normal, daily chores. They had no idea and no care what I was doing in there. I could have been cleaning the tub or the sink or the toilet as far as they were concerned. It was all the same thing to them. Now that they are older, and one is a teenager, they have chosen blissful ignorance about my pads. Sometimes I have dried them by hanging them individually on a string strung up in the shower. I close the shower curtain and the boys ignore them completely, the same way they ignore my bras and frillies when I hang them up to dry. Fred doesn’t even notice the pads anymore, or if he does, they are just a normal part of married life. He is married to a woman, and therefore there are feminine details he must get used to and accommodate.
When I must travel a lot during my period, I bring a few plastic zipper bags to store any used ones until I get a chance to wash them. In hotels they are easily washed by hand and dried by laying them over the tub, or for the more adventurous, by laying them over the heater in the room. Fresh pads can be stored in zipper bags and used as needed. Once we grow accustomed to the idea of using cloth pads, it seems like such a normal part of life, that the details become irrelevant. The details of brushing our teeth or washing our hair are mundane. No one is interested in them and we do them without a second thought. Cloth pads are the same way. Once we get into the cloth pad zone, it becomes abundantly clear that they are the best solution available. Our first thought may be “Ewww!” but our final thought is “Aaahhh!”
The Story Of The Woman With The Issue Of Blood
Mark 5:25-34
(25) And a certain woman, which had an issue of blood twelve years,
(26) And had suffered many things of many physicians, and had spent all that she had, and was nothing bettered, but rather grew worse,
(27) When she had heard of Jesus, came in the press behind, and touched his garment.
(28) For she said, If I may touch but his clothes, I shall be whole.
(29) And straightway the fountain of her blood was dried up; and she felt in her body that she was healed of that plague.
(30) And Jesus, immediately knowing in himself that virtue had gone out of him, turned him about in the press, and said, Who touched my clothes?
(31) And his disciples said unto him, Thou seest the multitude thronging thee, and sayest thou, Who touched me?
(32) And he looked round about to see her that had done this thing.
(33) But the woman fearing and trembling, knowing what was done in her, came and fell down before him, and told him all the truth.
(34) And he said unto her, Daughter, thy faith hath made thee whole; go in peace, and be whole of thy plague. -
why should i make my own soap instead of buyin' ready made store soaps?
6:43 AM PST, 7/12/2009
why should i make my own soap instead of buyin' ready made store soaps?....this is an awesome question
1) IT'S FUN!!!...it's the perfect way to let your creative juices flow...you can do it by yourself or as a family...think of it as a staycation if you will...it's an awesome way to relieve stress after a long day...it's great to keep that party, sunday school, vacation bible school, or sleep over full of new and excitin' activities
2) YOU CAN CONTROL THE INGREDIENTS!!!...your soaps can and will be full of awesomely good stuff for ones skin...none of that harsh nasty chemical crap
3) YOU CHOOSE THE AROMA...you don't have to settle for the same oh, same oh...your aroma can be as unique as you are...there are tons of fragrance oils from tomato to dirt as well as essential and essential oil blends...sensitive skin...skip the fragrance all together
4) YOU CAN PICK YOUR COLOR...if your color is wild, happy, fun, or if your color is down to earth all natural...either way there is a color for you...add a splash of color to your bathroom...you can even skip the color all together...who says just because your soap smells like apples it has to be red or green?
5) YOU GET TO CONTROL THE SHAPE...molds~molds~molds...there are more molds than you can shake a stick at...i myself like to think outside the average mold...i'm always on the look~out to reuse anything i can to make my handmade soap different...you can take just about anything and turn it into a soap mold...just think your watermelon soap can look like a dog, rock, heart, or any other shape you decide on...mix it up...always keep 'em guessin'
6) BE THE "PERFECT" GIFT GIVER...ever had to buy someone that has everything a gift?...it's not all that easy...most everyone uses soap :0...grouchy ole granddad to that sour~pus neighbor can and will appreciate the time and effort you put in to customize somethin' just for them
7) SELF~WORTH!!!...always be ready to start a new hobby...learn somethin' new...keep your mind workin'...keep your hands busy...the sky is the limit when it comes to makin' soap...just think of the awesome warm feelin' you'll get when you give someone one of your gorgeous little handmade treasures that you put your heart and soul in
8) START YOUR OWN BUSINESS...once you get the art and your style down pat...when your newly found, very addictive hobby has become more than just a hobby and is more like a newly found passion of yours~your ready to start sellin'...there are many~many ways to put your passion into to a profit
9) NO TROUBLE...NO WORRY...all of us as either been or know a pre-teen/teen...give them some MP soap base...glitter, doo~dads, color, and some kind of mold, it'll not only keep 'em out of trouble...it'll save you a few greys as well
10) MOST IMPORTANT REASON!!!!...a family that plays together~stays together...instead of tryin' to find ways out of the house...find ways to stay together...lets bring morals back home...soap makin' is good wholesome fun!!!
-
how can i use essential oils?
7:24 PM PST, 7/10/2009
Kick-start your day.
When you get ready to conquer the world, you will not spend hours in the bath, but will have a brisk bath at about 70 to 80 degrees Fahrenheit (21 to 27 degrees Celsius) while listening to cheery music or the early news (maybe not a good idea).
If you have some bright and sunny plants or fresh cut flowers (even a single bloom would do) around the bathroom at this time it will also add to your awakening. Since there is normally not that much time in the morning, your bathing experience would also not be that long.
When the bathwater has been drawn add a total of about 6 - 7 drops of any, or a mixture of the following oils:
- Peppermint
- Petitgrain
- Rosemary
- Fennel
- Clary sage
- Black pepper
- Jasmine
Healing the fragile ego
Here we would need to get you to relax a bit, and have some time to pamper yourself. The bathwater should be around 95 to 100 degrees Fahrenheit (35 to 38 degrees Celsius) and you could add some bubble bath to create the sensation of being touched when getting into the water. Instead of a harsh electric light, the softer light of a couple of candles will also make the world look a lot better.
If you could surround yourself with your favorite singer it will help greatly to cheer you up, but stay away from too sentimental or sad songs. Since you need to center yourself your bath may take about twenty minutes. A good idea is to also unplug the phone.
When the bathwater has been drawn add a total of about 6 - 7 drops of any, or a mixture of the following oils: (ensure that the oils are mixed in the water, and not floating on the bubbles, since this could irritate your skin)
- Lavender
- Melissa
- Frankincense
- Cedarwood
- Neroli
- Bergamot
- Juniper
Soothe the painful muscles
To help relax the muscles try and keep the bath a bit cooler than what you would normally do at about 98 - 99 degrees Fahrenheit (around 37 degrees Celsius) but when in the bath let hot water in to make it a bit warmer, and have a good long soak.
You need not have low lights, but to prevent you from needing to get out of the bath, just when your muscles are un-knotting themselves, maybe unplug the phone.
Some people may find reading in the bath relaxing at this time, but a slightly soggy book works on my nerves.
When the bathwater has been drawn add a total of about 6 - 7 drops of any, or a mixture of the following oils:
- Basil
- Neroli
- Marjoram
- Black pepper
- Rosemary
- Ginger
- Marjoram
Interlude to an intimate evening
Depending on the day you had - decide if a cooler bath will make you relax, or increase the temperature if you feel you need a warmer bath.
To get yourself in the mood, set the stage with only a candle or two for light and soft sensuous music. If your partner can join you in the bath, and the bath is big enough, it might be an idea to have a shared bath.
When the bathwater has been drawn add a total of about 6 - 7 drops of any, or a mixture of the following oils:
- Geranium
- Ylang ylang
- Jasmine
- Petitgrain
- Sandalwood
- Carnation
To make the bath even more romantic you could scatter a couple of rose petals on the water.
Getting ready for deep sleep.
When you want to do nothing else than to simply have a good bath, and crawl into bed, it might be a good idea to have a quick shower to wash and take care of the hygiene, and then get into your relaxing bath for about ten minutes.
Here you may want to get the water temperature to about 98 to 105 degrees Fahrenheit (37 to 41 degrees Celsius) in which you can wallow for about 15 minutes.
When the bathwater has been drawn add a total of about 6 - 7 drops of any, or a mixture of the following oils:
- Melissa
- Lavender
- Chamomile Roman
- Clary sage
- Petitgrain
- Frankincense
- Neroli
So next time when you sit surrounded in your bath, spare a thought to the idea that it can be far more of a happening than just simply a cleansing ritual.
Should you suffer from health problems, please take note that some of these baths described above may be too hot for you, since it may increase your blood pressure. If in doubt, please consult your licensed medical practitioner.